
Making an On-line Public Assistance Overpayment Claim ePayment
Step-by-Step Guide for First Time DWD ePayment Center User
-
PIN and Provider Number field. Enter your PIN or
Provider Number and click the Find button.
If you have a PIN and a Provider Number, you must do one transaction at a time. Do not enter a PIN and a Provider Number.
-
Name field. This field will show the name of the client
whose PIN or Provider Number was entered.
If this name is incorrect, please call 800-943-9499.
-
Address field. This field will be displayed under your
name.
If the address displayed below your name is not a current address, please type your current address in the New Address field.
If you are a provider, no address will be displayed as there may be more than one location.
-
Balance fields. These fields show the balance for each
program of assistance that you currently owe for. These
balances will be totaled below.
Balances may not reflect payments made in the previous few days, as we need to enter them into the system yet.
-
Payment fields. Enter the amount you wish to pay for
each program of assistance.
This will be totaled below and that total will reflect your total payment at this time.
- If you wish to have a record of the amount paid for
each program, you may print the screen at this time by
clicking the Print button.
The receipt you can print from the payment site will not be split into programs; it will be a total payment. You will receive a repayment summary through the mail for each program of assistance you paid toward at the beginning of the following month whether you print this page or not.
The Check Account Status button will bring you to the Epayment Services Main Menu where you can manage your account, review pending payments, edit recurring payments, view your payment history and update your profile.
After you complete this step, click the Make Payment button.
-
If you have not yet registered with the payment system,
you must do so now.
Registering lets you make payments, view payment history, and securely store your account information. Registration is easy and secure and you only need to do it once.
- Click Register.
- REGISTRATION
Registration allows you to create an account with the payment system in order to store accounts and easily access payment information in the future.
There are two sections to Registration, Payor Identification and Payor Profile. Complete the requested information in both sections, and remember that all bold fields are required.
Payor Identification
In this section, you create your own Username and Password. Provide the required information, following the instructions on the screen for required number of characters. Please note that both are case-sensitive when logging in. Make a note of your Username and Password and keep it in a secure place.
Payor Profile
In the Payor Profile section, complete all the bold or required fields.
- Zip Code:This field requires a U.S. zip code. If you do not currently have a U.S. zip code, you may enter 99999 in order to proceed with the registration process.
- Shared Secret Question: Select a question from the drop down list and provide an answer up to 20 characters. This information will be used for security validation in the future if you call Customer Service or select the forgot password link.
-
PAYMENT INFORMATION and PAYMENT DETAILS
Payment Information section provides information about your payment.
- Payment Amount: Payment amount
- Payment method: e-check
- Scheduled Payment Date: Date payment made
Payment Details section provides details unique to your payment.
Click Continue to proceed with this payment. Select Cancel to return to the previous screen.
-
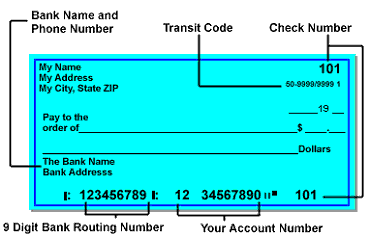
E-CHECK ACCOUNT INFORMATION. Because you are paying by
e-check, you will need to enter your bank institution routing
number and checking account number here.
- Routing Transit Number: A 9-digit number that identifies your bank. For checking accounts, the RTN appears as the first group of numbers at the bottom of your check.
- Account Number: The account number for your savings or checking account. For checking accounts, this is the second group of numbers at the bottom of your check. Be careful not to include the check number, which is the last group of numbers at the bottom of a check.
- Re-Enter Account Number: In order to avoid any processing errors, you are required to enter the account number again.
- Account Type: Select checking or savings as the type of account. Most money market accounts are categorized as savings accounts. If you are unsure, please contact your financial institution.
- Account Category: Select consumer or business as the account category.
- Save this Account: If you would like to save this account for future use, select the checkbox.
- Account Nickname: If you chose to save this account, you must enter a unique nickname for this account, up to 20 characters, to identify this account in dropdown lists in the future.

-
VERIFY PAYMENT
- Reenter your login password
- Confirm your payment
- Keep a record of your Confirmation Number, or print the page for your records
- Your payment process is complete!
- Log out of the system.